Cover 0 defense is simply a fancy term for man-to-man coverage.
The 0 in the name of the defensive scheme refers to the fact that there’ll be no deep help over the top from either the free safety or strong safety.
There are various "Cover" defensive schemes, and the number after that word generally refers to how many players will provide deep over-the-top help.
In this way, all of these defenses are referred to as zone coverage, since players will be responsible for covering a zone on the field rather than a specific offensive player.
This is where Cover 0 differs greatly from the other zone defenses such as Cover 2, Cover 3, Cover 4, and more.
With no extra deep help over the top, Cover 0 is a true man-to-man defensive scheme.
Every defender has a specific player on the offense that he’s assigned to cover.
All other players are tasked with blitzing the quarterback.
This is why Cover 0 defenses are often used in passing situations in which the defense wants to put extra pressure on the quarterback.
While this extra pressure is a great thing, it also comes with its downfalls as well.
Let's take a closer look at the Cover 0 defense, including who should run it and how it's run.
Who Should Use the Cover 0?
Cover 0 defense can be used by any defensive team. It's an extremely simple defense to teach, as it's simply man-on-man.
As a coach, you don't have to teach more complicated zone defensive schemes.
You only need to tell each defender which offensive player they're responsible for covering and let them do their job.
Again, all other defenders who don't have a man coverage assignment will just blitz the quarterback.
To run a Cover 0, though, you’ll need quick and speedy defenders, especially defensive backs, who can keep up with fast wide receivers.
You'll also often need at least one of your linebackers to have the ability to keep up with tight ends and running backs who can go into coverage.
With no extra help over the top, all your defenders must be able to cover their assignments.
If they don't, the offense could gain a big play.
Strengths
1. Simple to Teach
Again, Cover 0 is very simple to teach and install.
There aren't complicated reads you need to teach.
You don't need to have players cover all offensive players who enter their zone.
Instead, simply give each defender an offensive player to cover, and let all other players blitz freely.
2. Forces Quarterbacks to Make Quick Decisions
With many defenders blitzing him, quarterbacks have to make quick and accurate decisions against the Cover 0.
Many young quarterbacks especially don't face a lot of pressure, so they might not be as good at responding.
3. Doesn't Allow for Deep Patterns
When the defense is blitzing at least six defenders, it doesn’t give the quarterback a lot of time to wait for longer passing routes to develop.
As such, he often has to dump the ball off on shorter routes and hope his receivers can make a move to gain extra yardage.
Weaknesses
1. Puts Pressure on Defensive Backs
Each defensive back on a team that runs Cover 0 must be very good at pass coverage.
There really can't be a glaring weakness here, as a mistake by one player can result in a huge offensive play since there's no extra help over the top.
2. Clears Parts of the Field
When defenses decide to blitz in Cover 0, they’re sacrificing coverage on the field.
That means there’ll be more space, especially over the middle of the field, for receivers to run routes, catch passes, and make moves to gain big yardage.
3. Requires "Sure Tacklers"
Because of the one-on-one nature of Cover 0, defenders need to be solid at tackling.
When passes are completed against Cover 0, the defender covering the receiver who caught the ball is often the only one around him.
It's important that he makes the sure solo tackle or at least slows the ball carrier down long enough for help to arrive.
How a Cover 0 Defense Is Run
Stage 1: The Defensive Line
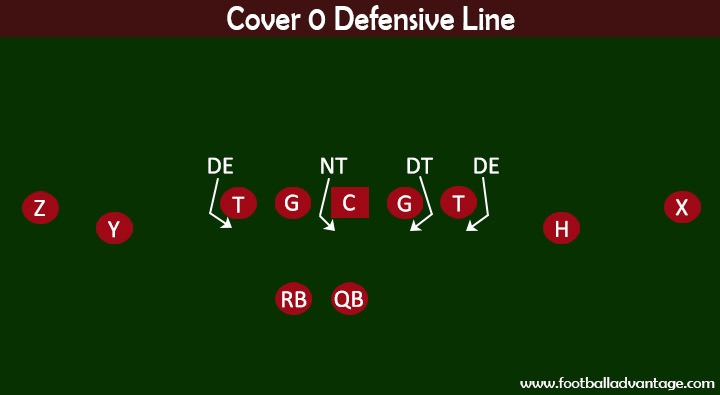
For our example, we'll say that the offense is lining up with four wide receivers, no tight ends, a running back, and the quarterback out of the shotgun formation.
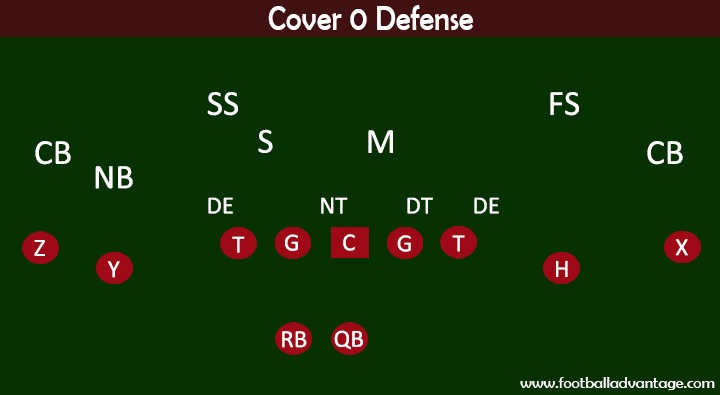
The defense, meanwhile, will counter with four down defensive linemen, two linebackers (a Mike and a Sam), a free safety, strong safety, two cornerbacks, and a nickelback.
The defensive linemen have a fairly simple job in Cover 0 schemes.
On almost all plays, their job is to get into the backfield as quickly as they possibly can.
They’ll all be assigned one-gap coverage and will do everything in their power to get through that gap en route to the quarterback.
The defensive ends will line up on the outside shoulder of the offensive tackle to try to spread out the offensive line a bit.
They’ll have C gap responsibilities.
In addition to bursting through that gap, they must also keep outside contained, in case the offense runs a pitch or a quick screen to the running back.
The defensive tackle on the weak side of the field will line up on the offensive guard's outside shoulder, toward the offensive tackle.
He’ll have B gap responsibilities on that side of the field.
If he can also get a little chip on the offensive tackle to free up some room for the defensive end, that’d help, too.
The nose tackle will line up on the outside shoulder of the center. He’ll have A gap responsibilities on his side of the field.
His job is to blow up the interior of the offensive line.
If he can make contact with the other offensive guard, that's even better, as it’ll open up space for a blitzing linebacker.
Stage 2: The Linebackers
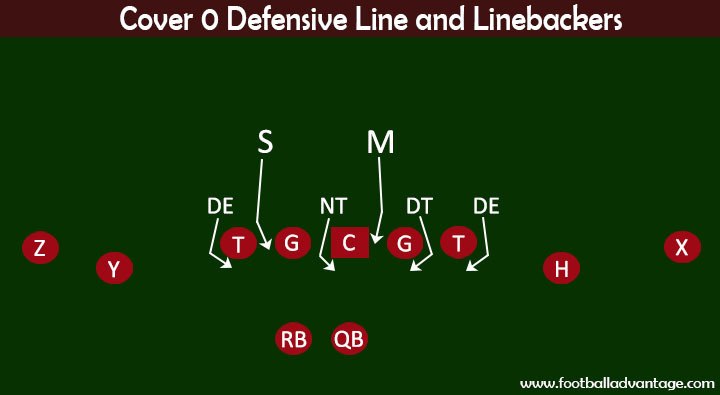
In this defensive example, we'll have a Mike (middle) and Sam (strong-side) linebacker on the field.
The Will (weak-side) linebacker will be subbed off for a nickel back.
Some defensive coaches will decide to take their normal Will linebacker and ask him to play the Sam position on this play, as he might be the better blitzer.
The Mike will align himself between the center and the offensive guard to his left.
He’ll have responsibilities for blitzing through the A gap on that side of the field.
He won't have a coverage assignment at all, so all he has to worry about is getting through the line of scrimmage as quickly as possible.
The Sam linebacker will line up between the offensive guard and the offensive tackle on the other side of the field.
He’ll have B gap responsibilities.
Again, just like the Mike, he won't have a pass coverage assignment, meaning he can just worry about getting through the line of scrimmage as quickly as he can.
Stage 3: The Secondary
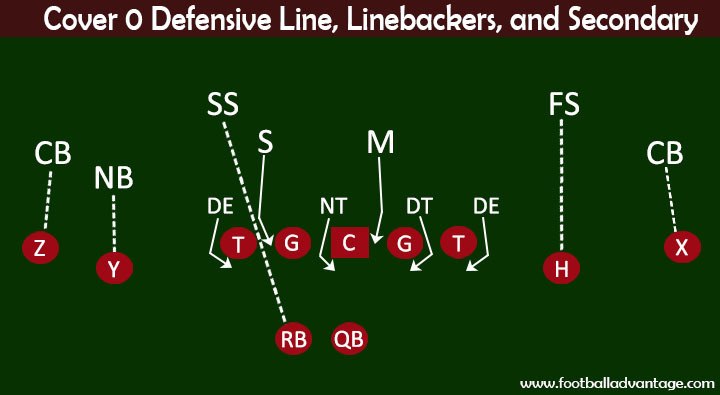
The pass coverage matchups will all happen in the secondary, which will consist of five players in this case.
Each defender in the secondary will match up man-to-man with one of the five eligible receivers the offense has (the four wide receivers and one running back).
The two cornerbacks will line up out wide against the X and Z wide receivers, who’ll align themselves on the line of scrimmage.
These two cornerbacks will play an inside shade, trying to force their receivers to run routes toward the sideline.
This will cut down on the area of the field they have available to run.
The free safety and the nickelback will have coverage responsibilities over the Y and H wide receivers.
Both of those receivers will be lining up off the line of scrimmage, about halfway between the outside wide receivers and the offensive tackles, from sideline to sideline.
The nickelback will often have coverage responsibility on the Y wide receiver since he's often the "third best" receiver on the offense.
The nickelback will line up a little closer to the line of scrimmage than the free safety will, in almost press coverage.
This is to make it a little tougher for the Y to get off the line.
The nickelback will line up around the same depth as the two linebackers.
The free safety, meanwhile, will give himself some extra depth of about a yard or two behind the linebackers.
This will give him some extra time to backpedal if the H runs a deep route.
The H also will often run shorter routes, allowing the free safety to use his forward sprinting ability to make up the extra ground he's giving up by lining up deeper.
The strong safety will have coverage responsibility over the running back.
He’ll therefore line up on whatever side of the field that the running back does. In our example, this will be his right.
The strong safety will give himself some extra depth, just like the free safety.
He'll also need to make sure he lines up between the Sam and the defensive end so that he can keep his eyes on the running back at all times.
Unlike the other defenders in the secondary, he’ll need to look over and through offensive and defensive players before and after the snap to keep an eye on his coverage assignment.
Offenses will often try to sneak the running back behind the offensive linemen and then quickly out for screen passes against Cover 0.
They're hoping to take advantage of the fact that the strong safety has a more difficult job of picking up and staying with his coverage assignment.
Conclusion
Cover 0 is an extremely simple defensive scheme to teach players.
That's because it's a man-to-man defense in which each player in the secondary is given a specific receiver to cover.
All other players are usually just asked to blitz.
While there are variations that can be made to the Cover 0 defense to include some zone coverage for linebackers, the easiest version of the scheme is a blitzing defense.
It's a great defense to run against a spread offense because it puts pressure on the quarterback and forces him to make a quick decision.
At the same time, if you want to run the Cover 0, you need to make sure that all your defenders in the secondary can cover really well since they won't have any extra help over the top from safeties.
They also need to be sure tacklers, as they won't have help in that department, either.

